Infrared heating is a fairly new concept to some so it’s understandable if you have questions about how it works and how it can benefit your property. This guide is designed to cover all the basics: we’ll talk you through the different types of infrared heater, the ‘dos and don’ts’, as well as how to install them to get the most out of your system. If you want to know the exact science behind infrared and radiant heat, we highly recommend reading our definitive guide to infrared, but if you’re ready to start choosing products, read on…
Infrared heaters create warmth by emitting radiant heat, which is absorbed by surfaces and objects, then re-radiated back into the room. You can feel this type of heat on sunny days when light pours in through the window. The light hits the surfaces in your room, gradually warming them up over time so even when the sun has stopped shining, they remain warm to the touch for a long while after. Infrared heaters work in much the same way. They project waves of heat outwards from the surface of the appliance, which is then retained by the fabric of your home to provide an enduring form of warmth throughout the day.
Infrared doesn’t heat the air – it instead travels through the air until it contacts a person or object directly. This ‘A to B’ heat transfer is what makes infrared heaters so efficient and means that minimal heat is lost compared to traditional convector heaters. Infrared heaters come in many shapes and sizes, from slimline panels that are great for standard interiors, all the way to electric patio heaters, which are superb for spot heating outdoors.
Infrared is a game-changer in the heating industry and has quickly gained traction as a low energy, eco-friendly heating solution. It’s even been cited in national press as a potential alternative to gas central heating, which currently contributes a substantial amount to the UK’s carbon emissions. But even without these environmental plus points, there are still plenty of reasons why infrared is beneficial for homes and businesses. This is why:
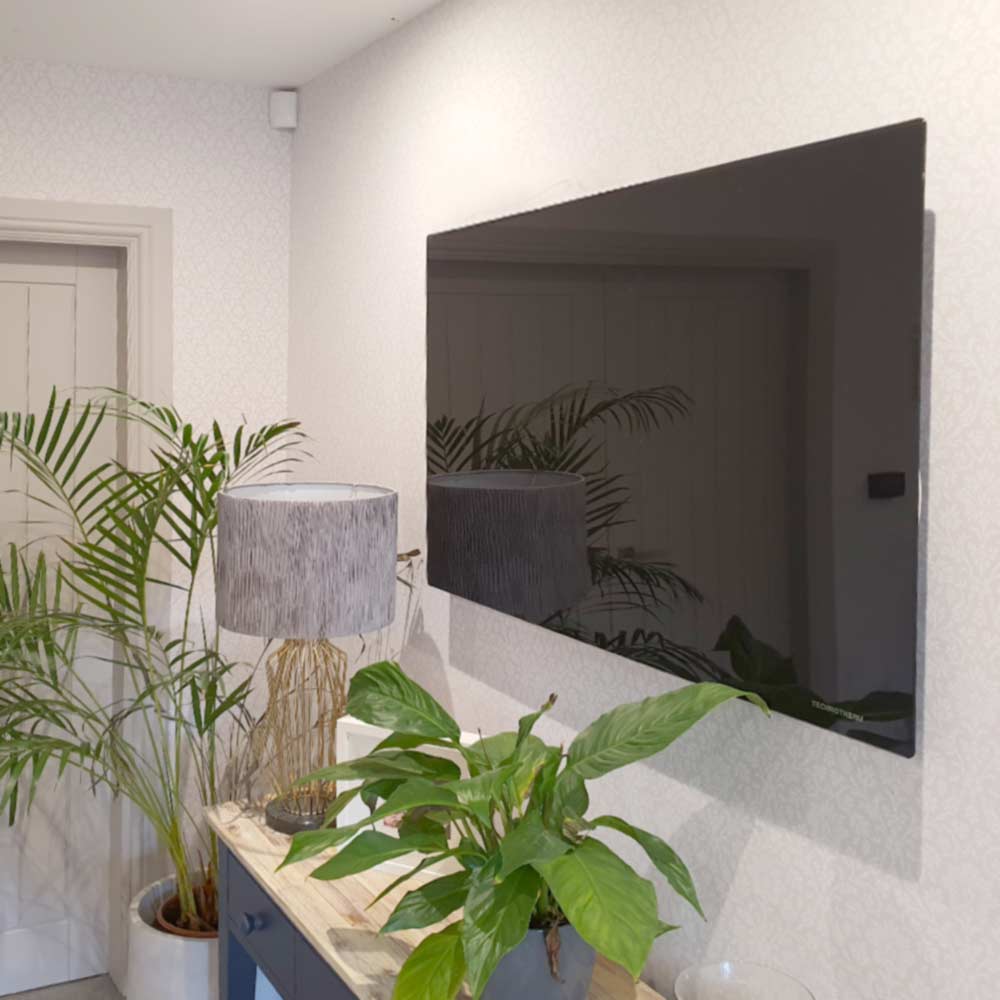
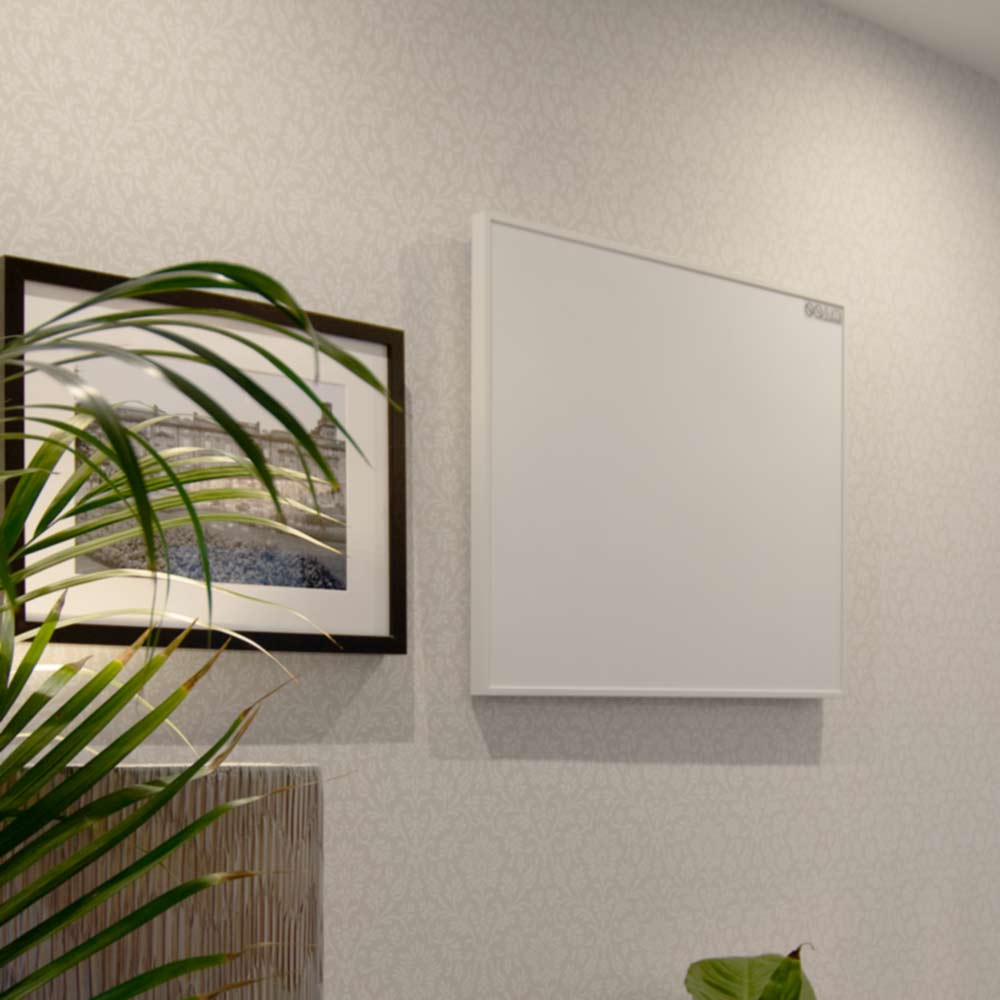
In terms of aesthetics, infrared products are also worlds apart from the heaters you might already be familiar with. There are no boxy white housings here – infrared heaters are the epitome of modern home heating and have sleek, ultra-slim designs that barely take up any room at all. They don’t monopolise wall and floor space like most heating systems do and can be ceiling mounted for a totally unobtrusive source of warmth.
Though all infrared heaters emit radiant heat, the inner workings of each product can differ depending on whether it’s a heater designed for indoor or outdoor use:
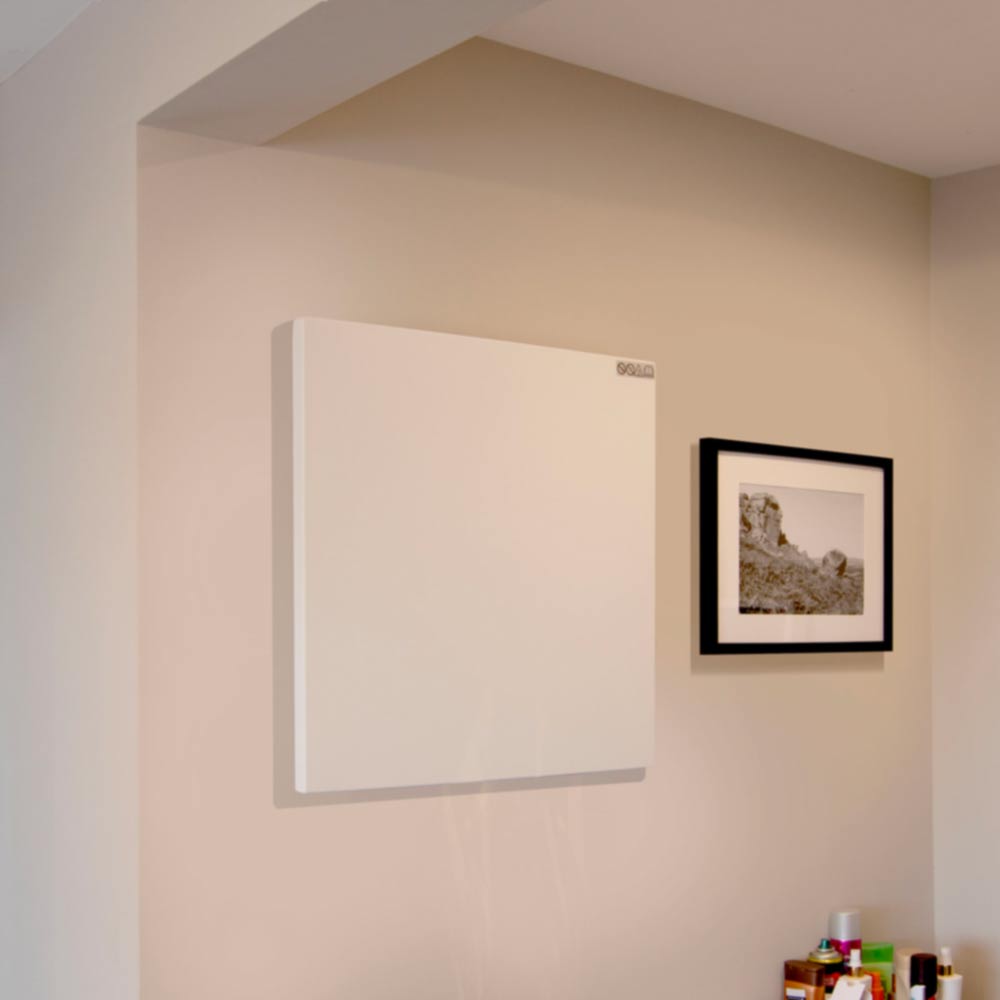
Infrared panels, also known as radiant panels, work by using a length of resistive wire that’s laid out beneath the surface of the appliance. As electricity flows through the wire, it heats up and conducts warmth through the front surface of the panel and out into the room. This same basic heating principle is also used in some types of patio heater, such as ceramic heaters and wire-element heaters, however they use a much higher wattage compared to radiant panels to compensate for colder outdoor conditions. Infrared panels have a simple construction and no moving parts which is why they tend to have exceptionally long lifespans compared to other electric heating systems. The type of infrared they emit is called ‘far infrared’ which is exactly the same as the heat produced by our own bodies and is the gentlest form of radiant heat.
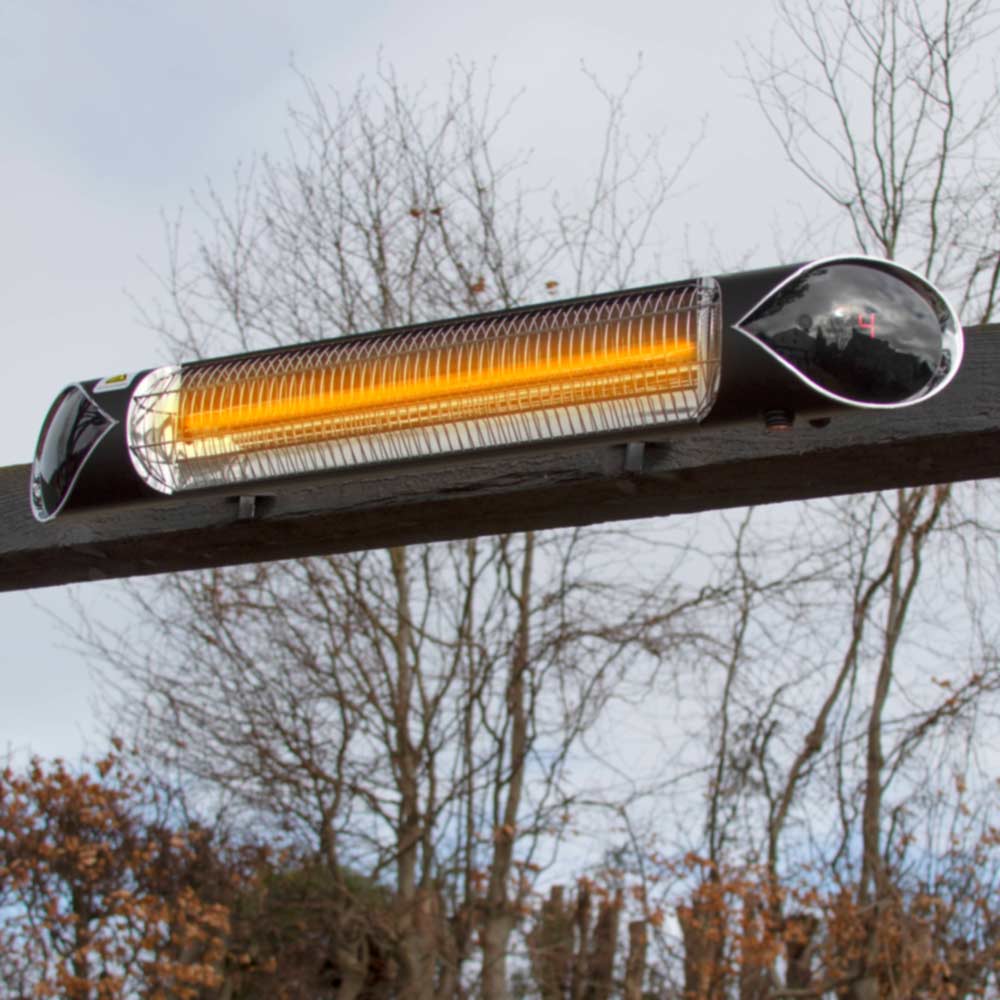
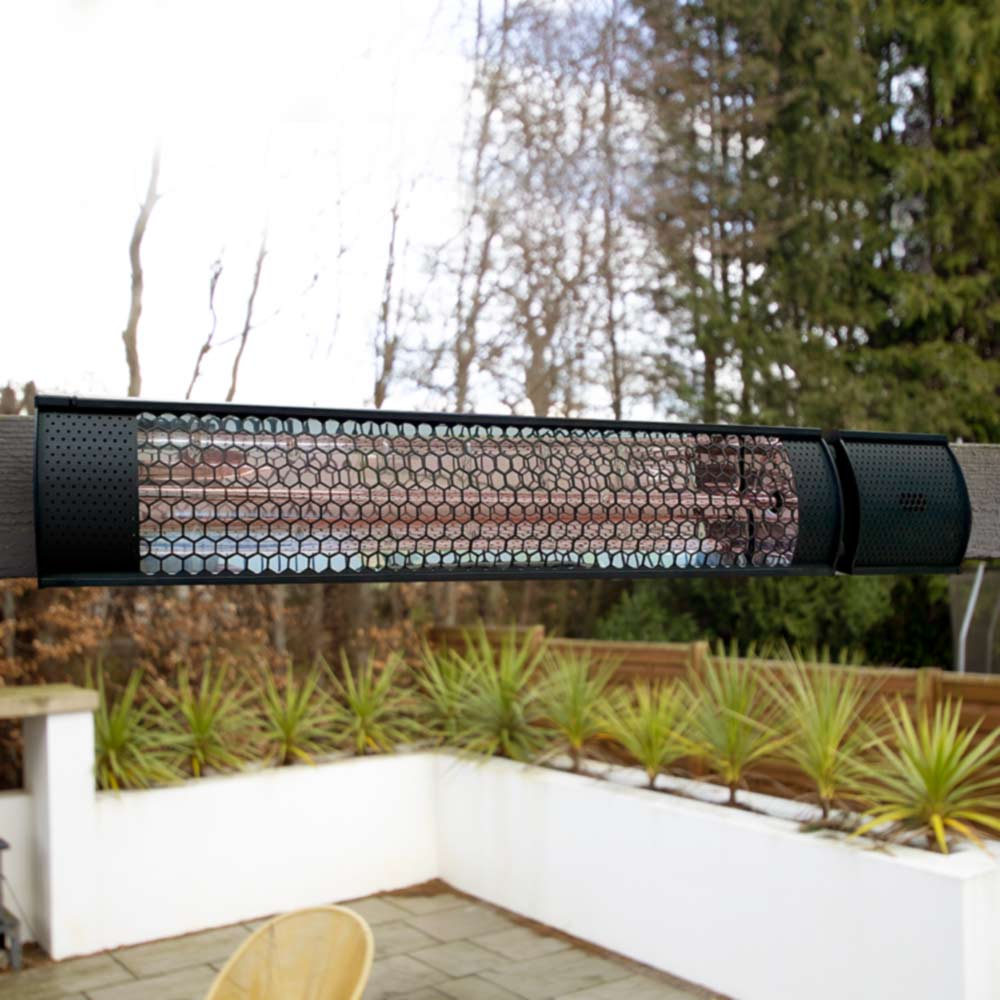
Electric outdoor heaters need to produce a much stronger form of radiant heat in order to offset the feeling of being out in the elements and glowing patio heaters do this by using an infrared lamp. These lamps use a tungsten or carbon filament inside a quartz bulb filled with halogen gas, and when switched on, produce an exceptionally high heat for instant warmth you can feel even on a breezy day. Their filaments get so hot that they glow with a strong light – a pleasant bonus feature as night draws in – providing additional illumination and a cosy feel while you’re sat outside. Glowing patio heaters are also known as halogen heaters or quartz heaters and use ‘near infrared’, which is the strongest, most vigorous form of radiant heat.
Traditional heating systems usually rely on convection, which is the circulation of warm air throughout a space. But as infrared heaters don’t use this method, are you missing out by not opting for a convection heater? Both forms of heating actually come with their own distinct benefits but you may find that infrared is particularly useful in a variety of different scenarios. Here are the main differences between convection and radiation:
Convection
Radiation
Relies on heating the air volume of a given space
Heats people and solid objects directly without heating the air
Circulates the air, with warm air rising towards the ceiling, then falling to the floor as it cools
Solid objects absorb infrared, become warm, then re-radiate this heat back into the room
Achieves quick results
Needs longer to take effect but provides a more lasting warmth
Is more prone to heat loss through draughts and poor insulation
Isn’t affected by draughts and air movement and is more efficient as a result
Tends to leave the floor much cooler than the ceiling
Creates uniform warmth from floor to ceiling
Can disturb dust, which can aggravate allergies
Doesn’t move dust and allergens
More freedom with placement of heater
Requires more careful ‘line of sight’ positioning to be effective
Convection involves heating the air volume of a room and appliances that use this method usually achieve quick results that can make spaces cosy without too much waiting around. This is one of the main benefits of convection and the reason it’s remained so popular as a heating method for domestic properties. As long as a convection heater isn’t blocked by furniture and other objects, it doesn’t matter where it’s placed; it will swiftly heat the surrounding air, allowing it to circulate around to every corner of the room. The issue with convection-based heating is that it’s much more prone to heat loss through draughts, poor insulation and air movement, so every time you open a door or window, your heaters have to start from scratch to reheat the space. This, in turn, decreases their efficiency and means you have to use more energy. Another common complaint of convection is that it can create a cold floor as warm air naturally rises toward the ceiling, meaning that living levels receive less of the benefit. This temperature difference can be so great that the ceiling may often be a couple of degrees warmer than the floor, meaning more energy is used trying to bring living levels up to the same temperature. This is a particularly pronounced issue in rooms with high ceilings – all of the heat rises up into the rafters and leaves the spaces that really need warmth at a noticeably lower temperature.
Infrared involves heating the surface area of an interior space rather than the air volume; this is because radiant heat is absorbed by objects and travels through the atmosphere until it comes into contact with something solid. Once infrared is absorbed by an object – e.g. the walls or ceiling – it’s then re-radiated back out into the room, in effect creating a 360° source of warmth. Infrared takes a lot longer to heat up spaces on initial start because it warms deep into the fabric of the building, but once heated up, rooms are uniformly warm from top to bottom. This often allows users of an infrared system to turn down their thermostat by a few degrees and still achieve the same level of comfort compared to if they were using a conventional heating system. Infrared doesn’t rely on air movement to transfer heat so it’s unaffected by draughts and also won’t disturb dust, pet hairs or other allergens. An essential part of using infrared heaters correctly is getting their positioning right. These heaters require a ‘line of sight’ to be most effective and should ideally be pointed to high occupancy areas of the room so that their warmth is directed to where it’s needed most. If in doubt, it’s always best to consult an expert regarding installation as poor positioning can make your system operate less effectively.
Infrared is part of the electromagnetic spectrum and within this band of wavelengths there’s a sliding scale of radiant heat types. On the one end, there’s gentle heating designed for all-day use; and on the other, there’s powerful warmth that’s great for outdoor applications. That’s the beauty of infrared – its numerous variations offer a solution for every space and every occasion, whether it’s for interiors or exteriors, homes or businesses. If you want to know more, here are the types of infrared used in our products:
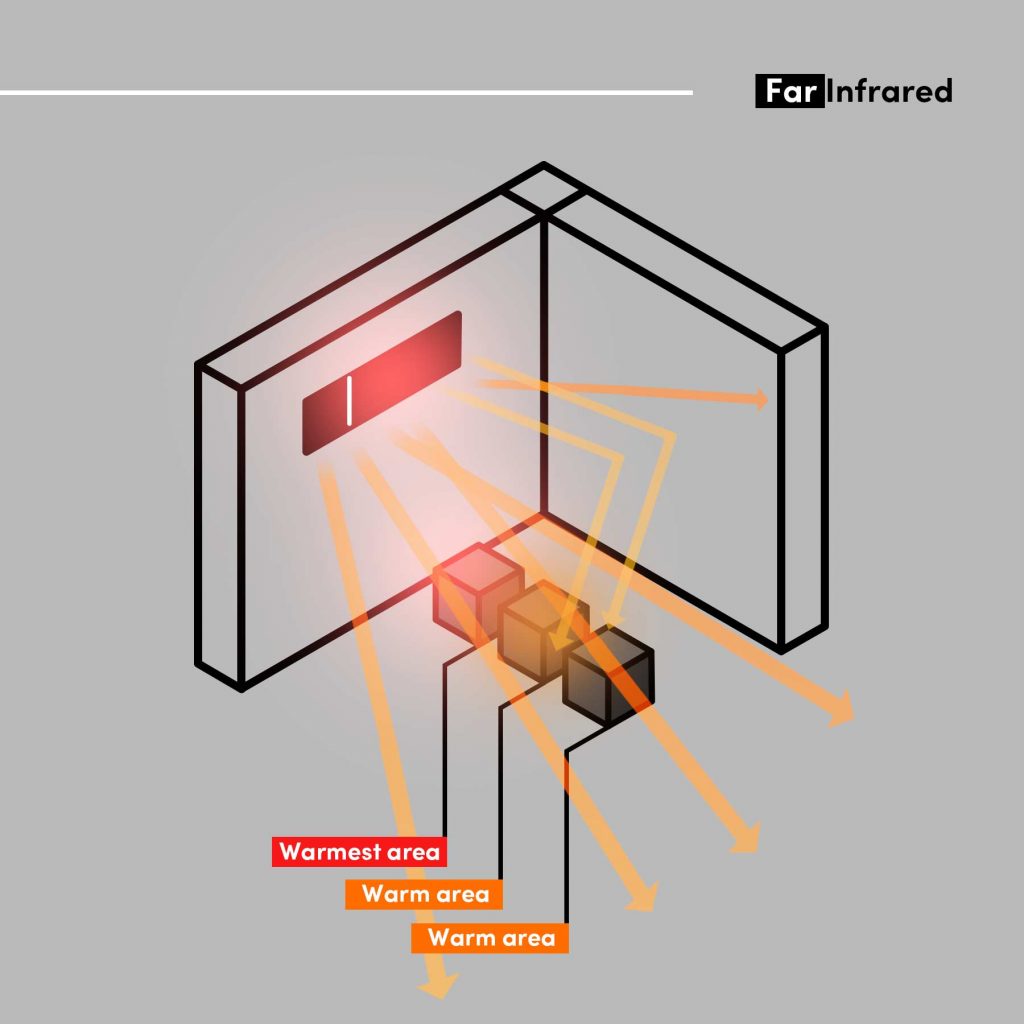
Far infrared is the gentlest form of infrared and it’s easily absorbed by the human body to create a deeper sensation of heat. It’s so mellow that it is used in a broad range of applications, from infrared saunas to assist muscle relaxation, to heat lamps for terrariums. This form of infrared is used in our heating panels and is best used in properties with a standard ceiling height, e.g. homes, offices and small retail spaces. Products that use this form of infrared are sometimes called far infrared heaters or FIR heaters.
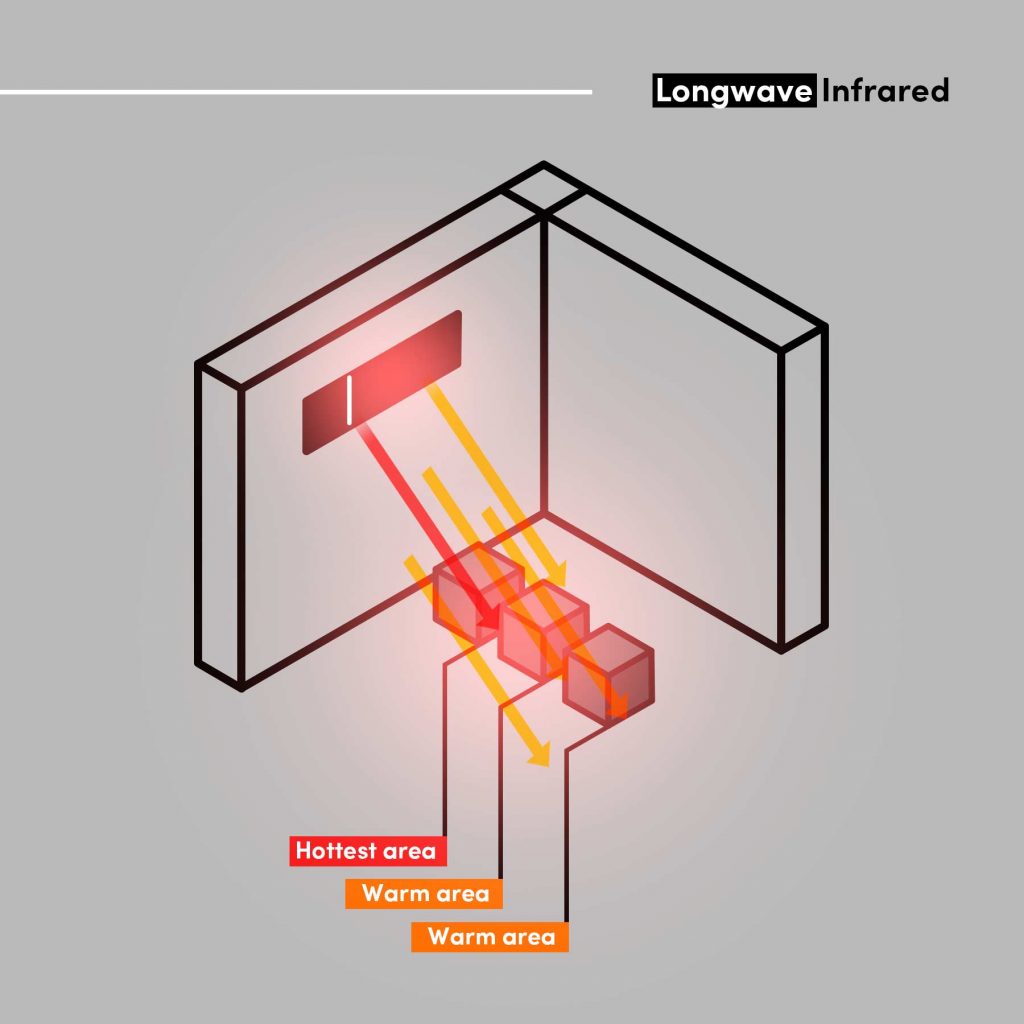
Longwave infrared is very similar to far infrared in terms of how it feels, so by and large, the two terms are used fairly interchangeably. However, longwave infrared is slightly stronger than far infrared, transmitted at a higher temperature which allows it to have an effect from a greater distance. That’s why longwave heaters are geared toward heating spacious areas. They’re typically used in lofty interiors with high ceilings, such as churches, meeting halls and barn conversions, though with careful positioning can also be used in sheltered outdoor spaces such as verandas and terraces. Our longwave infrared products include ceramic heaters, such as the Herschel Aspect range, as well as wire filament heaters like the Ecostrad Thermostrip.
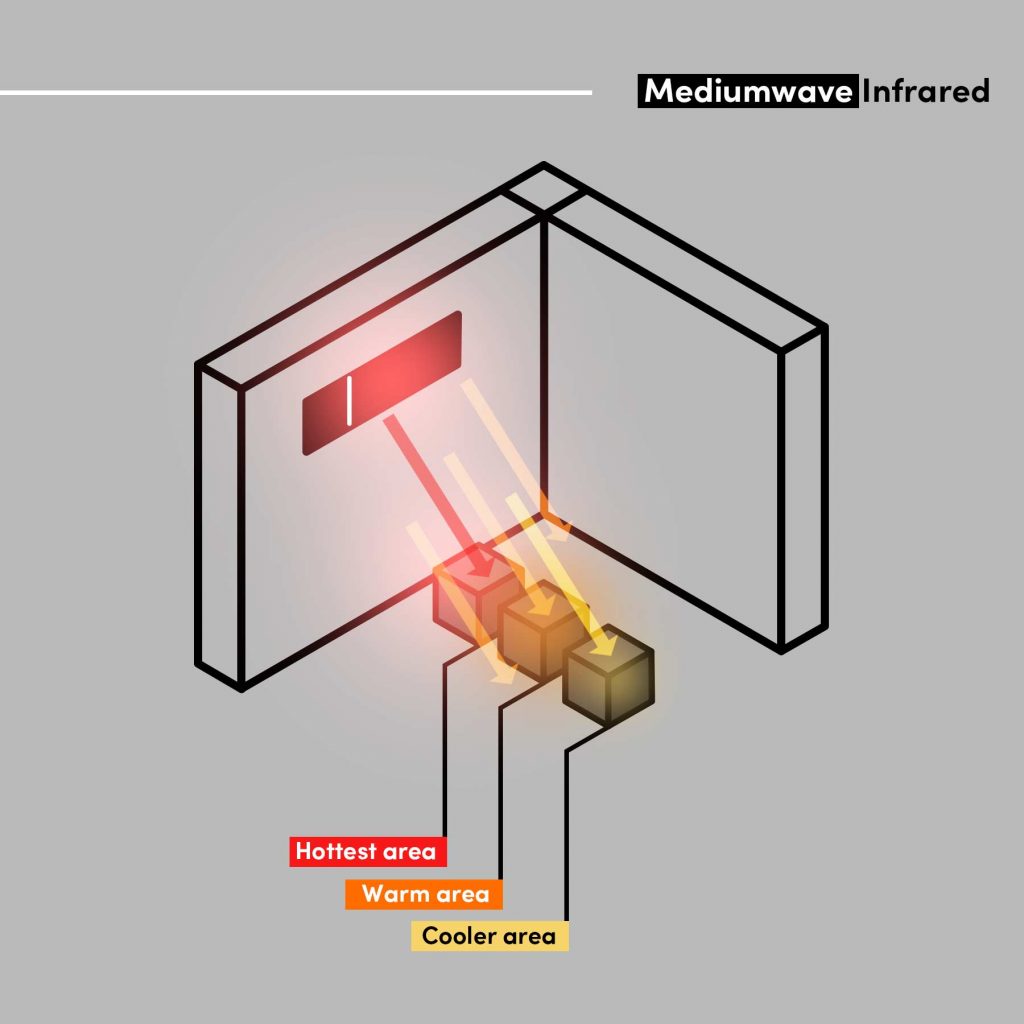
Mediumwave infrared is used in our carbon element patio heaters and provides a mid-point between the gentle, long-lasting effects of far infrared, and the more intense immediacy of shortwave radiation. This type of radiant heat is powerful enough to keep you warm in outdoor conditions and products that use this form of warmth will give off a red, rosy glow. The greatest benefit of mediumwave infrared is that it’s not as vigorous as shortwave and near infrared so you’ll be able to sit under one of these heaters for longer without feeling overly hot or uncomfortable. However, as mediumwave heat is gentler, it does mean that the sensation of this warmth can be offset by gusts and breezes so they tend to work best in sheltered outdoor spaces. Mediumwave infrared heaters are also good for spot-heating in hard-to-heat interiors such as workshops and garages.

Shortwave or near infrared heaters are ideal for outdoor heating, providing additional light and strong heat all from one source. Shortwave radiation is best used for on-demand heating outside because its robust warmth is enough to keep you comfortable even when temperature levels drop. It’s not suitable for all-day heating though – this type of infrared will start to feel a little overbearing after a while due to its strength, which is why it’s for infrequent use outside rather than for round the clock heating indoors. Near infrared is easily absorbed by water and quickly loses energy in the process; this is why it tends to feel like a very ‘shallow’ sensation of warmth on your skin. Unlike longwave and far infrared, shortwave infrared will never be able to provide a lasting feeling of warmth and is another reason its use tends to be limited to occasional spot heating.
Infrared surrounds us constantly. Our bodies keep warm by absorbing the ambient infrared radiation given off by surrounding objects: walls, ceilings, people, and, most significantly, the sun. We ourselves radiate infrared, which is why a room feels warmer if it’s full of people, even if nobody’s physically touching. When ambient levels of infrared fall too low, that’s when we need our heating. We’re used to seeking warmth through physical contact with warmer molecules that transmit some of their heat when they make contact: warm air from a convection heater, warm water in a hot bath, or the warm surface of a hot water bottle. But infrared offers a more elegant and efficient solution: the heated panels raise the average temperature of objects in the room, directly addressing the chilly ambient temperatures that were keeping you cold and raising them to a comfortable level. It’s simple but profoundly effective – and as safe as a summer’s day.
One of the concerns we do hear at Infrared Heaters Direct is whether infrared radiation can be dangerous. Because it’s usually compared to the warmth from the sun, we are often asked whether infrared can cause damage to skin. It’s a natural assumption as we’re used to hearing the word ‘radiation’ in relation to ultra-violet light, gamma rays and other such nasties. But while these are all types of electromagnetic radiation, the key is the temperatures required to produce them. As an object gets hotter, the more types of radiation it starts giving off. Cooler objects just give off infrared. As they get hotter, they start to give off visible light (which is why our patio heaters glow, like the tip of a hot poker), but they have to get up to 3000 Kelvin before they start giving off ultra-violet light – and that’s something our 1000w infrared panels can’t do! So, you see, you can heat like the sun without burning like the sun. The panels do get to between 90 – 100 °C, a little warmer than an ordinary radiator, but there’s always the option to mount them on the ceiling to keep them out of touching distance.
Our low glare patio heaters do get hotter than our panels which means they produce visible light and a stronger form of radiant heat that isn’t as easily absorbed by our bodies. The invigorating warmth of a patio heater, known as near infrared, is great for taking the edge off a cold evening breeze but can feel rather too intense after a long time under the glow. That’s why they’re designed to be used in short bursts, rather than for all-day comfort heating. But even so, near infrared heaters don’t get anywhere near hot enough to produce harmful types of radiation. As long as they’re used as intended, they’re completely safe too.
All of our infrared heaters are CE marked, undergo rigorous testing and conform to British safety standards so you can purchase with total confidence.
Infrared heating panels are designed to be used as a main heating system and are perfectly safe to use overnight provided they have been securely attached to the wall or ceiling. When they’re used with a thermostat, they can even be programmed so you can have your heating come on at set times and temperatures that suit your daily routine.
If they’re used freestanding, they should never be left unattended because they could cause a hazard if they’re knocked over onto carpets and soft furnishings. If you’re using an infrared product as a portable heating solution, always make sure to unplug it after use, allow it to cool, then store it away safely with no trailing wires.
Infrared heaters do use less electricity compared to other traditional heating methods and you can see this by comparing their wattages. For example, a storage heater that’s able to heat an area up to 12m² might require an output of 1200w, whereas an infrared heating panel designed to heat the same area would only require 550w to achieve the same results.
The main reason that infrared heaters have such low wattages compared to many other heating methods is that they rely on warming spaces using radiant heat. Infrared moves through the air to deliver heat rather than using the air itself to raise the temperature of the room. This has three distinct benefits:
In contrast, convection-based heating systems which rely on circulating warm air are far more prone to heat loss, meaning they need to work harder to bring rooms back up to comfort levels. In older, draughtier properties with poor insulation, this can lead to inflated energy bills as convection heaters can struggle to keep rooms adequately heated.
Infrared products make superb low energy heaters when they’re used with a digital thermostat. Thermostats allow you to program your heating hour by hour, day by day, so your heating schedule can perfectly match your lifestyle. This not only gives you a more convenient way to heat your spaces: it also allows you to slim down your heating bills to ensure you’re only using energy when absolutely necessary.
As mentioned in the section above, infrared heaters are able to slim down your heating bills because the radiant heat they produce is so efficient and effective. It offers minimal heat loss, uniform room temperatures and a lasting warmth that won’t need to be topped up quite so often compared to convection-based methods. But those reasons aren’t the only way infrared heaters can help to save you money:
Our infrared radiant panels have exceptionally long lifespans and require no maintenance so there’s no need for regular annual servicing or checks. Installation is also a quick and easy process for a professional electrician, so you don’t need to worry about laborious and invasive plumbing, or the time-consuming extension of pipework. Some infrared heating panels – such as the Cürv wall mounted range – are suitable for DIY installation which means in some instances you may not even need to hire a contractor. If you’re confident enough in your own skills, all you need to do to start using your infrared heater is attach the mounting brackets to the wall, slot the heater in place then plug it into the nearest socket.
From a commercial point of view, infrared heating can be a far more cost-effective way to keep properties warm. In spaces like garages, warehouses and industrial units, it can be difficult to keep work areas adequately heated due to their high ceilings and large air volume. Not with infrared, however. Radiant heat works on a ‘line of sight’ basis so heaters can be directed toward workspaces and high-occupancy areas so all of the heat is delivered to a specific space. Why heat the whole volume of an industrial unit when only the workbenches need warmth? Infrared provides targeted heating that keeps staff and customers warm no matter how large the space.
To ensure your infrared heaters are exceptionally economical to run, it’s vital that they’re paired with a thermostat to allow you to create a heating schedule and set specific temperatures. You can either use one thermostat to act as a central controller for your entire system, or you can use multiple thermostats for zoned heating. Zoning your heating means you can set programs and temperature levels on a room by room basis, which gives you much greater control over your energy usage. For example, rather than heating your spare bedroom to the same level as your main bedroom, you can turn the temperature down by a few degrees and save money long term. Digital thermostats monitor your room temperature with total precision and prevent comfort levels straying too far away from the target.
As with any heating system, running costs will vary depending on a range of factors about the property, such as its level of insulation, location, age and construction. A modern home built to a higher insulation level will naturally cost less to heat compared to a Victorian town house with single glazing so unfortunately there is no convenient ‘one size fits all’ answer. There is, however, a way you can estimate potential running costs with just a few simple details.
All you need to know to make your estimate is:
Here’s an example calculation of how to work out the running cost of a heater per day. Let’s assume that we’re on an energy tariff of 13p per kWh and we want to work out the running cost of a 550w heater for 7 hours. We would calculate it like so:
(Heater output in kW x hours in use) x pence per kW hour = estimated cost per day in pence
In this case, it would be (0.55kW x 7) x 13, which means roughly 50p per day. But it’s important to bear in mind that heaters are very rarely on at maximum power for a full hour! When used with a thermostat, your infrared panels will only need to switch on a fraction of the time to top up heat levels in your room. In reality, they might only be drawing power a third of the time in a well-insulated property so in this instance it would be more accurate to say it would only cost 17p to run for a full day.
The length of time your heaters will be on is also largely affected by the seasons – we rarely need quite as much heat in summer as we do in winter, so if you’re looking to make a rough estimate for a year’s running, you’ll need to take this into account.
Our infrared products fall into three categories: infrared panels, commercial heaters and patio heaters. Here’s a quick overview of which you should choose depending on the space you’re aiming to heat:
Yes, they absolutely can – infrared heaters are fantastic home heating solutions for a number of reasons:
Infrared products work very differently to other electric heating solutions. Radiant heat needs time to take effect because it’s absorbed by the surfaces and brickwork in your home and has a longer initial heat up time compared to heating appliances like radiators and storage heaters. That being said, infrared heaters are much more efficient because the fabric of your home will retain this heat for longer and won’t lose it to air movement. Once your rooms get to temperature, your infrared panel will only need to switch on a fraction of the time to keep them cosy, and you can keep running costs to a bare minimum. Because infrared heats rooms evenly and retains more warmth overall, many users find that they can turn their thermostat down by a few degrees without sacrificing any comfort, giving even more scope for savings on running costs.
Infrared is one of the best forms of heating for commercial buildings because of how effective it is in large, open plan interiors. Radiant heat travels in a wave from the heating appliance to wherever it’s directed toward. So, in the same way the sun’s rays are able to travel through space to warm us on a sunny day, the heat of infrared is able to reach over long distances without losing any of its effectiveness in the process. You can heat warehouses, factories, shopping centres and concourses with infrared and never need to worry about any warmth being lost through draughts. All of the radiant heat made by these products goes straight to the end user and even allows you to be selective with which areas you heat so your business can operate more efficiently. There’s no need to heat storage areas or loading bays when all you want to do is warm the spaces that your workforce use regularly. Infrared allows you to target specific areas for zoned heating, giving you plenty of opportunity to reduce running costs without having to warm the total air volume of your property.
If you’re looking for infrared panels, we’ve made a handy infrared calculator to help you find the right wattage for each space in your property. All you need to do is enter the dimensions of the space you need to heat and select the age of your property from the dropdown and we’ll give you an estimated wattage to match. Then you’re free to choose an infrared panel, or combination of panels, that will meet that total to make sure your room is heated effectively. If you can’t find a heater with the exact wattage required, always round to the next size up to make sure you’re choosing a product that will be able to comfortably heat your space. Avoid rounding down! Otherwise, you the risk of selecting a heater that’s underpowered and will struggle to keep your room warm. A heater that’s underpowered will spend more time on as it labours to heat the surrounding area, wasting money and reducing its lifespan in the process. Choosing the next size up ensures that you’re selecting a product that will cope with your room’s heating demands and all this means is that it will bring spaces up to temperature a little quicker.
For large commercial or public spaces that have high ceilings, such as churches, industrial units and leisure centres, look for ceramic heaters that have an appropriate heated area. You can always use multiple heaters to cover larger areas. If you’re not sure what product you need, feel free to contact our Sales team directly via phone or email and they’ll help to match you to the perfect solution for your project.
Infrared heaters do need a little more forethought when it comes to choosing an installation location because they require a direct line of sight to whatever they need to heat. Always try to aim them towards the parts of your room that you use most often, like seating areas, so that you and your family receive the majority of the heat. Arguably the best way to install infrared panels is on the ceiling because all of the heat is directed downwards toward living levels and offers a completely unobstructed spread of warmth over the whole area. Where ceiling installation is not possible, you should wall mount your panels so that they can ‘see’ you easily. If they’re blocked by walls and furniture, keep in mind that it’s the objects that will be receiving most of the heat and not you! For more guidance on where to install infrared panels, please read our blog on infrared panel installation.
In larger commercial spaces, the same logic still applies, however you may find that ceiling suspended products in particular offer the better choice. Heaters like the Herschel IRP4 can be particularly effective in retail spaces because they hang from the ceiling and provide a broad spread of heat that’s directed downwards toward living levels. Ceiling mounted infrared heaters can also be used for spaces like warehouses, garages and factories.
Some infrared heaters, like radiant panels, can be installed DIY in a matter of moments. All you have to do is screw the mounting brackets to the wall, attach the heater to the brackets, then plug it into the nearest 3-pin socket. Patio heaters that are designed to be used freestanding also offer a ‘plug and play’ solution so you can start using them instantly. Installing heaters DIY is the best option if you need quick results or if you think you might change the installation location of your heater further down the line. Plug-in infrared heaters can be a convenient option if you’re only using one or two around the home, but if you’re planning to install multiple heaters, you’ll need to have them hardwired by a professional so that they don’t overload the ring main of your property. If you’re looking for infrared heaters that are suitable for a DIY fitting, look for products with the ‘plug and go’ icon on our website.
Infrared heaters must be hardwired by a professional electrician in the following circumstances:
All electric heaters for use in bathrooms must be hardwired by a professional in order to conform to UK safety standards. Before choosing a product for purchase, always ensure that it carries an IP protection rating suitable for bathroom use to ensure it is well protected against the ingress of water.
Infrared patio heaters will always need to be hardwired by an electrician if they are intended for permanent fixture outside to ensure their wiring is protected against the elements. Any infrared heaters intended for outdoor use must have at least an IPX4 rating to ensure they have the minimum protection required against water ingress. A higher rating may be required for spaces that see heavy rain and other harsh weather conditions. Read more about IP ratings for patio heaters here.
If you’re planning to use multiple infrared heaters, you will need to make sure that they’re hardwired to ensure that they don’t overload the ring main of your property. It’s always best to talk to a professional about your project if you’re planning to undertake a large installation.
The best way to control infrared heaters that are installed indoors is with a programmable thermostat. Digital thermostats allow you to set temperatures and create a heating schedule for each space in your home or business to ensure total comfort round the clock. This gives you complete control over your heating and also allows you to slim down your energy usage by selecting exactly when and to what extent your heaters use power. It’s important to note that infrared heaters do not come with thermostats built in; this is because they have exceptionally long lifespans which will usually outlive most thermostats. Most products require you to purchase a thermostat separately in order to control any indoor infrared heaters, otherwise the appliance will simply heat to full power whenever it’s switched on. Purchasing thermostats separately will allow you to change or upgrade your heating control whenever you see fit and ensures that it does not impact the service life of the heaters themselves.
In smaller properties, you have the following control options:
Using multiple thermostats is a great way of slimming down your energy usage even further because it allows you to take into account how you use each individual space. So, if you have a spare room that is rarely used, you can set it to a lower background temperature to cut down your running costs. In commercial or industrial spaces that have large, open-plan interiors, it’s highly advisable to use multiple thermostats in order to take into account the different microclimates that can occur in these areas.
Thermostatic controllers can’t be used outside because conditions fluctuate far too quickly for them to be of any use. This is why electric outdoor heaters tend to be paired with accessories such as rundown timers, motion sensors and dimmers to provide a more limited form of control that doesn’t rely on accurate temperature management. Each of these controllers can help to cut down on energy use by either limiting the amount of time the heater is running or by reducing the amount of power they use. To help you get set up more quickly, some patio heaters – such as those in Ecostrad’s range – come with basic controls already built in and are a convenient option if you’d prefer an all-in-one solution. If you are purchasing an external controller for installation in an outdoor location, always ensure that it has an IP rating high enough so that it’s protected against rain.
When choosing a digital thermostat, you need to consider the level of control you need, as well as how you want it to be installed. Should it be a plug-in thermostat or hardwired? Does it need to be wall mounted or freestanding? Is basic programming enough or does it need to have the latest WiFi control? Be aware that some products are designed to work with specific controllers (e.g. the Technotherm ISP range with the Technotherm TPF-Eco) so if you’re ever unsure whether a thermostat is suitable, give our Sales team a call on 0330 880 8383. Here are some considerations you may want to make before choosing a controller:
Most thermostats will offer daily and weekly programming so you can set a heating schedule that conforms to your everyday routine. Having a programmable heating system is absolutely essential for day-to-day comfort and will also ensure that energy is only being used at clearly defined times, as per your schedule. 24/7 programming in every room in the house lets you create heating schedules for individual spaces to take into account exactly how they’re used. This means you can have one heating schedule for your living room, which is used daily, and a separate schedule for your home office, which may only be used a couple of times a week. If your infrared heaters are going to be your main heat source, choosing a programmable thermostat is a must.
WiFi control is becoming increasingly popular because it allows users to program their heating systems from anywhere in the world. It’s quick and easy to set up in most instances: just download a heating app to a smart device – like a phone or tablet – then connect it to your home router so it can communicate with your WiFi thermostat. Smart control lets you make changes to your heating more spontaneously and react to variations in your routine so you can prevent any wasted energy. For example, if you’re away from home and forget to turn the heating down, all you need to do is swipe your phone screen and lower the temperature. Or if you’re on holiday and it looks like it’s going to be particularly cold while you’re away, you can increase the temperature even while you’re abroad to make sure your home is protected from any frosty spells. An additional benefit to smart heating is that apps often come with a plethora of extra features to help slim down energy usage. Functions common in heating apps are energy-usage statistics, to help you to identify where to save money; as well as guest account functions to provide restricted access for temporary users. WiFi control can be beneficial for a range of users but can be particularly useful for landlords who need the heating system of a property to be remotely accessible.
Some thermostats are designed to offer a very basic level of control and may be the preferred option if you’re intending to use your infrared heater infrequently, e.g. as a portable top-up heater. These thermostats allow you to select a preferred temperature but offer no programming control so any further changes need to be made by hand. If your heaters are going to be part of your main heating system, we don’t recommend using basic thermostats for a variety of reasons. They won’t offer the programming you need for day-to-day convenience, they need continual manual adjustment, and most importantly, they won’t allow your heaters to run at optimal efficiency. If you’re only going to use your infrared heater now and then, a basic thermostat may suit you just fine, but if you’ll be using your heaters on a daily basis, you should always opt for a programmable thermostat.
In domestic properties, plug-in thermostats can make an excellent choice, especially if you want to install your new heater quickly and without professional assistance. They simply plug into the nearest 3-pin socket and then your heater plugs into the front of the controller itself – it’s as straightforward as that. These thermostats range from the very basic all the way to programmable wireless models and if you feel like you want to change your control system later down the line, uninstalling these thermostats is just a matter of unplugging them from the wall. Opting for a plug-in model can be a good option if you’re only installing one or two infrared heaters; however, if you’re planning to fit heaters en masse, you’ll need to use a different type of controller to avoid overloading the ring main of your property. Plug-in thermostats will take up a socket and can look a little unsightly compared to hardwired or freestanding thermostats but the freedom and convenience they offer is more than enough to compensate for some users.
The main draw of hardwired thermostats is that they have a neat appearance that looks in keeping with rest the room, like a light switch or plug socket. These thermostats need to be installed by a professional electrician but if you’re having your heaters hardwired at the same time, fitting a hardwired thermostat can simply be absorbed into the larger overall project. Hardwired thermostats can be the better choice if you only need one or two points of control but if you feel you may want to expand your system at a later date, a wireless control method may be the better option as they often scale up more easily.
Though all hardwired thermostats are wall mounted, not all wall-mounted thermostats are hardwired. Some freestanding thermostats come with a cradle for wall mounting if you prefer your controller to be neatly tucked out of the way or kept out of reach of young children.
Freestanding thermostats are able to communicate wirelessly with heaters that are fitted with compatible RF receivers. Depending on the heater brand, some products may come with receivers already built into the back of the appliance, whereas others may require you to purchase a receiver separately. Wireless thermostats are sometimes the most convenient option because they can be placed anywhere and repositioned at leisure if you find that there’s a better place to take temperature readings. Like a plug-in thermostat, they’re designed for easy set up without a professional – just insert the batteries and you’re ready to start. Freestanding thermostats do require the user to keep a close eye on battery levels, otherwise you could find yourself without heating control until your next trip to the shop. If a freestanding thermostat loses power, it could lose your saved settings so be sure to keep an eye out for any low power warning indicators to let you know when the battery needs changing. Movable thermostats may also not be the best choice for homes with young children. Though many offer lockable control screens, curious hands could move the thermostat to another room or hide it entirely. In this instance, a secure, wall-mounted option may be preferable.
Freestanding thermostats are designed for easy DIY setup but any receivers you purchase separately will need to be hardwired to your heaters by a professional.
Some infrared patio heaters are available with or without remotes to suit the type of control you need.
Electric outdoor heaters with remotes are exceptionally useful if you want an ‘out-of-the-box’ solution with all of the necessary controls built in. They allow you to select different heat levels so you can use less energy on days when full warmth isn’t required and may also come with additional features, such as a rundown timer.
Non-remote versions of our outdoor heaters are designed so that you have the option to fit the control system of your choice, whether it’s a motion sensor, timer or dimmer switch. Without a controller, these heaters will simply heat at their maximum output whenever they’re switched on. Some of our infrared patio heaters are also suitable for indoor use, and when used as such, the non-remote versions can be used with thermostats.
As of January 2018, all fixed electric space heaters for indoor use must be compliant with new EU energy efficiency directives known as Lot 20. All of our infrared heaters are compliant with Lot 20 when used with a thermostat that comes with weekly programming, as well as at least one of the following extra features:
Lot 20 brings electric heaters up to a higher standard of efficiency by incorporating simple energy-saving measures to minimise power consumption. It applies to any electric product used for all-day heating, like storage heaters, electric radiators, panel heaters, and of course, infrared panels. This means that whenever you buy an infrared heater with a Lot 20 compliant thermostat, you’re investing in the most efficient solution for your home or business. What makes infrared different is that it’s already a low energy option because radiant heat is more easily retained by the brickwork of your property. Pairing it with one of the latest thermostats enhances this efficiency even further, trimming down running costs to minimum, and with weekly programming you can enjoy set and forget heating that takes care of itself.
Electric outdoor heaters – like our infrared patio heaters – are Lot 20 exempt and don’t have to be paired with any extra controllers. However, we still highly recommend fitting some form of control to outdoor heaters to minimise energy usage and running costs.